
Choosing Your Chain Length
It’s often difficult to picture just how long an 18” chain is when you are reading a necklace description. So, here’s a handy Necklace Length Guide from Cooksongold.

I also find it handy to take a piece of string that is the described length and wrap it around my neck. The above image is great, but we all have different size necks. That’s why there is an inch or two range in the lengths below. The string is a foolproof way to really see where the chain you are buying will land on your neck/chest. You can tape the ends together when the two ends are in front of you if you don’t want to hold onto the ends.
Choker Length: 13 – 15 inches
Collar Length: 16 – 17 inches
Princess Length: 17 – 19 inches
Matinee Length: 20 – 24 inches
Opera Length: 28 – 37 inches
Rope Length: 37+ inches
If you have any questions, please don’t hesitate to comment below or drop me an email at mybrownwren @ gmail.com (please remove the spaces before sending).
Rules are Meant to Be Broken

There are so many rules in enameling. They’d make your head spin. But, I’ve discovered through trial and error that some rules are meant to be broken. Rules are passed down from one artist to the next and often blindly followed. Some artists like to break the rules, and by doing so, they discover that not everything they learned is true.
Rule #1 - Always start with a clean, oil free piece of copper to enamel
I learned from Ricky Frank that this isn’t always necessary. Now, he’s been enameling a long time, so I figured is must be right. There is always a little bit of fear that goes along with breaking the rules, but I tried it for myself, and he was right. If you think about it, we use Squeege Oil to make enamel adhere to the surface of metal. It’s an oil. It burns out under the torch flame or in the kiln. However, if you are using Klyr Fire to adhere enamel to a curved surface or attempting to coat your metal with liquid enamel, it won’t stick without first cleaning the metal. Another trick I learned from Amanda Dennison, is to rub the surface of your metal with liquid enamel. It breaks the surface tension and allows the liquid enamel to stick to your metal! Other artists, like Jan Harrell, use a surfactant to increase the surface tension, which makes the enamel stick better. This is especially great when you are applying watercolor enamel, acrylic enamel or mason stains to your enamel. Alternatively, you can rub the enamel with a little rubbing alcohol on a paper towel.
Rule #2 - You have to remove all firescale in order for enamel to adhere to copper
This is another misnomer that was demystified by Ricky Frank. All you really need to do is remove loose firescale. Copper will oxidize given the right conditions, despite whether there is a surface of enamel covering it or not. So much time is wasted cleaning firescale from copper prior to enameling. Pickling the metal can cause any enamel that may be on the opposing side to permanently dull. So, give it a try. Leave that firescale and see what happens. You will be pleasantly surprised, and you’ll save yourself a lot of time and frustration along the way! The only time I really worry about removing firescale is if I am using transparent enamel directly on a metal surface.
Rule #3 - You have to use eutectic solder when soldering pieces to be enameled
This has been disproved by many artists, including Ann Havel who uses medium solder when enameling. I personally have had issues with my pieces staying soldered when enameling, but as I understand it, that is more of an issue with gravity than the type of solder. When you are enameling post earrings, as an example, it’s best not to have them sticking up in the air. The flow of the enamel and the forces of gravity will pull them over. If they are hanging down, the enamel will hold them in place. Give it a shot. It has worked for me.
Rule #4 - Your edges have to be perfectly filed before you start enameling
This may just be a rule I made for myself in the beginning but I don’t follow it any longer. The reason I don’t follow it any longer is simple. I file my edges between every firing. This may sound excessive, but it really does prevent little flakes of firescale from floating off the edges and landing on the enamel. I use a diamond file perpendicular to the edge and then file from the back at a 45 degree angle to prevent the piece from sticking to the trivet in subsequent firings.
Rule #5 - Decals have to dry overnight before firing
I discovered in my own practice that when I apply decals to enamel, once I have removed as much of the moisture as I can with a soft paper towel they need only about 15 minutes on top of the hot kiln or on a cup warmer before firing. What I do differently is to partially fire them, just until the decal melts to the surface of the enamel (when you hear the poof inside the kiln or after the decal catches fire and turns clear in the torch flame. I remove it from the kiln or torch and carefully prick any bubbles with a sharp needle and then re-fire to maturity. This has been a much more successful method for me in my practice. I have far fewer image break ups and voids in the image this way.
Experimentation is key to learning if what you have been taught all along is the only way to do something. So, don’t be afraid to try new things. Break the rules. You may discover an easier or better way to do something.
Why Does Jewelry Tarnish or Oxidize?
I bring this up because it is a common question and because I recently noticed that my jewelry was tarnishing, or more appropriately, oxidizing, more quickly than usual. Before I answer the question, I want to give you a little background on metals and their alloys that will give you a better understanding of why jewelry oxidizes.
Pure metals like 24K gold and 99.9% silver tend to oxidize very slowly. However, jewelry is rarely made from pure metals because they tend to be too soft to stand up to everyday ware and tare. Consequently, metals like gold and silver are alloyed to make them stronger. For example, sterling silver jewelry is made up of 92.5% fine or pure silver and 7.5% copper. When sterling silver is exposed to the air, it will oxidize over time. The rate at which it oxidizes depends on many different factors, which I address below.
Cosmetics and Cleaning Products: What we put on our skin affects our jewelry if it is in contact with these substances. Some products are more acidic than others and can cause jewelry to tarnish. Cleaning products, like chlorine and ammonia, accelerate oxidation and should be avoided. Remove your jewelry before cleaning or wear gloves if at all possible. It is better for your jewelry and your health.
Sweat: Sweat often contains sulphur. The more you sweat, the more likely your jewelry is to tarnish. Take off your jewelry when you exercise to help minimize oxidation.
Hormones/Prescription Drugs/Body Chemistry: Changes in hormones, like during menopause, can affect the rate of oxidation of your jewelry. Prescription drugs, like sulphur drugs, antibiotics, anti-depressants and some other drugs may also have the same affect. Additionally, some of us have more acidic skin than others, due to diet or other mitigating factors. The range of skin’s acidity, in general, tends to be very small. However, it can be a possible factor in why your jewelry oxidizes more quickly than your friend’s jewelry.
What to do when your jewelry oxidizes…
There is no one-size-fits-all solution for jewelry oxidation. There are several factors that go into deciding the best method. First of all, did your jewelry already have a patina that was applied by the jewelry designer? If so, dipping it in the cleaning solutions you can buy from your local jewelry store won’t be your best choice. They tend to strip off most of the patina, leaving the jewelry looking worse than before you tried to clean it. Additionally, that solution is far too caustic for gemstones, pearls and other inclusions. I only use this to clean bright silver jewelry when it begins to tarnish.
Sunshine Cloths and Pro Polish Pads are my go-to for cleaning up everyday tarnish on jewelry. They work on bright silver or silver that was given a chemical patina. They also work on other metals as well. I am currently working on a cleaning instruction card to include with all jewelry purchases, as well an anti-tarnish strip with each jewelry purchase. These help to keep your shiny, new jewelry from oxidizing quickly. Just pop your jewelry in the little plastic bag supplied with the anti-tarnish strip when you aren’t wearing it. Click here for a short little video from Beaducation that explains the difference between Sunshine Cloths, Prop Polish Pads and anti-tarnish strips.
Please let me know if you have any questions. I’m always happy to respond!
The Making of a Zinnia Ring

Need a fresh new something to brighten up your wardrobe and your mood? I've got just the thing for you, and I'll show you some of the steps of how these cute Zinnia rings are made. They are all sterling silver, with ethically sourced tourmalines from Afghanistan. Are you drooling yet?
I can’t stop looking at them. Did those come out of me? Well, they did and I just have to move on - or do I? We shall see how you all respond to these unique, one-of-a-kind hand crafted rings.
As promised, I will show you a few steps that go into the making of the rings. Admittedly, there are a few steps missing. That’s because I’m horrible at documenting the process.

The first couple steps, which you don’t see here, are making the bezel (that little serrated wire that wraps around the stone, soldering it onto a flat piece of silver and sawing that out real close to the bezel. I like to create a double back plate to prevent solder from flowing into my little petal cut outs and make the stone sit higher.
This image here shows all the pieces soldered together, with the stone setting atop the bezel. You can’t fully drop the stone into place until you’ve soldered on the ring band, but it looks so much prettier in pictures with it setting in there! Don’t you think?
I free hand a design in pencil based on the shape of the stone. It will get a few tweaks along the way, between the drilling of the holes, the sawing of the petals and all the filing and sanding.
So, here’s the beginning of what it will look like. You see it setting atop a well used charcoal block. That’s one of the materials I solder on. It is a great reflector of heat, which helps when you have multiple layers of silver you are soldering together.

After drawing out the design, I take a nail set and create little divots inside the lines of each little petal at their widest point. This gives me a seat for my drill bit so it doesn’t skid across the surface of the silver. There’s nothing worse than that. It creates such a mess to clean up!
After all my divots are made, it’s time for drilling holes. This is normally a very easy process, but during COVID times, things aren’t always easy or normal. Right now, I have half of my tools and supplies at home and half at my studio at Blueschool Arts. One of my very favorite, and most invaluable tools, is my Foredom Flex Shaft. It’s a type of drill, but so much better. Drilling holes with it is so simple, because it has a foot petal that allows you to adjust the speed. At my home studio, there is no room for my flex shaft, so I am using a Dremel. It has a variable speed, but it starts at a much higher RPM than the flex shaft, which isn’t great when using tiny drill bits. Needless to say, creating the first ring (pictured here) was a bit of a challenge. I got everything drilled out, but I did have some skidding and rounding around the holes, which took a bit of time to clean up. I went to my regular studio at Blueschool on Tuesday to drill out the other two rings with my flex shaft with some much smaller drill bits. What a breeze that was! Everything was at the proper height. I can’t tell you how badly I wanted to scoop up my jeweler’s bench and my flex shaft and pop them in the car!!!
With my holes drilled, I could start sawing. This is where the fun begins. To create these cute little petals, I have to take one end of the saw blade out of the saw frame (not shown) and run it up through the hole in the silver and then tighten it back in the frame before I can saw around the hole to complete each petal. It might sound a bit monotonous, but it feels very meditative once you get the hang of it. Having the right saw and the right size blades makes all the difference in the world. For this ring, I used my old German saw frame that’s more than 30 years old, with a 4/0 blade. It was a bit rough going, but I think it came out pretty good. For the other two rings, I used my Knew Concepts saw frame and an 8/0 blade. I picked them up at the studio when I was drilling the holes. What a difference! When they say the right tool makes all the difference, they aren’t kidding!!!

After all the holes were sawn, I took several different needle files and smoothed out my holes. Having used a bigger blade than what was warranted, I had a bit more clean up to do with this ring. It just takes some extra time and patience, but you can smooth out all the jagged lines from the saw teeth pretty nicely.
To the right, is the top of the ring all cut out. What a satisfying moment!
Next, is finish work - cleaning up rough edges. I use needle files, 3M bristle disks and a pumice wheel in the Dremel to get the job done. This is the time where I can refine the shape of the points a bit to match up with my cutting lines or to modify if I think the shape is a bit off.
From here, it’s time to make the band and solder it to the top. I didn’t get any shots of that. Pooh!

I have found that I am really enjoying using Jessica Cote’s Hone and Highlight tumbling medium when I want to create pieces that will be given a patina, like these were. It is a ceramic medium that goes in the tumbler along with your work. I just dunk each piece in a solution of liver of sulphur and water until they are black, rinse and tumble. The medium wares away some of the patina - on the high spots - and hardens your work. With serrated bezels, I’ve found it’s best to only leave in the tumbler for an hour because the tips ware down. I imagine you could leave it in longer, but I don’t want to chance it on something precious. There’s plenty of time to experiment later - right?
To the left you see the ring fresh out of the tumbler and ready for the stone to be set. It’s in my sweet little GRS MicroBlock Ball Vise. It’s another one of my all time favorite tools! I bought it after I broke my elbow. When I was healing up, I ended up getting tendonitis and this really helped to reduce ware and tare on my arm.
At this point, all that’s left is to push the bezel over onto the stone with a bezel rocker to hold it in place, and to touch up the polish on the tips of the petal points. I wanted them to shine a bit. The Hone and Highlight leaves a more matte finish on metal. I don’t mind it for most things, but for these rings, they need a little shine!
Well, what do you think? Leave me a message in the comments. I’d love to get your feedback. If you’re interested in a ring, I am happy to take a custom order, or you can check out these rings on my website here.
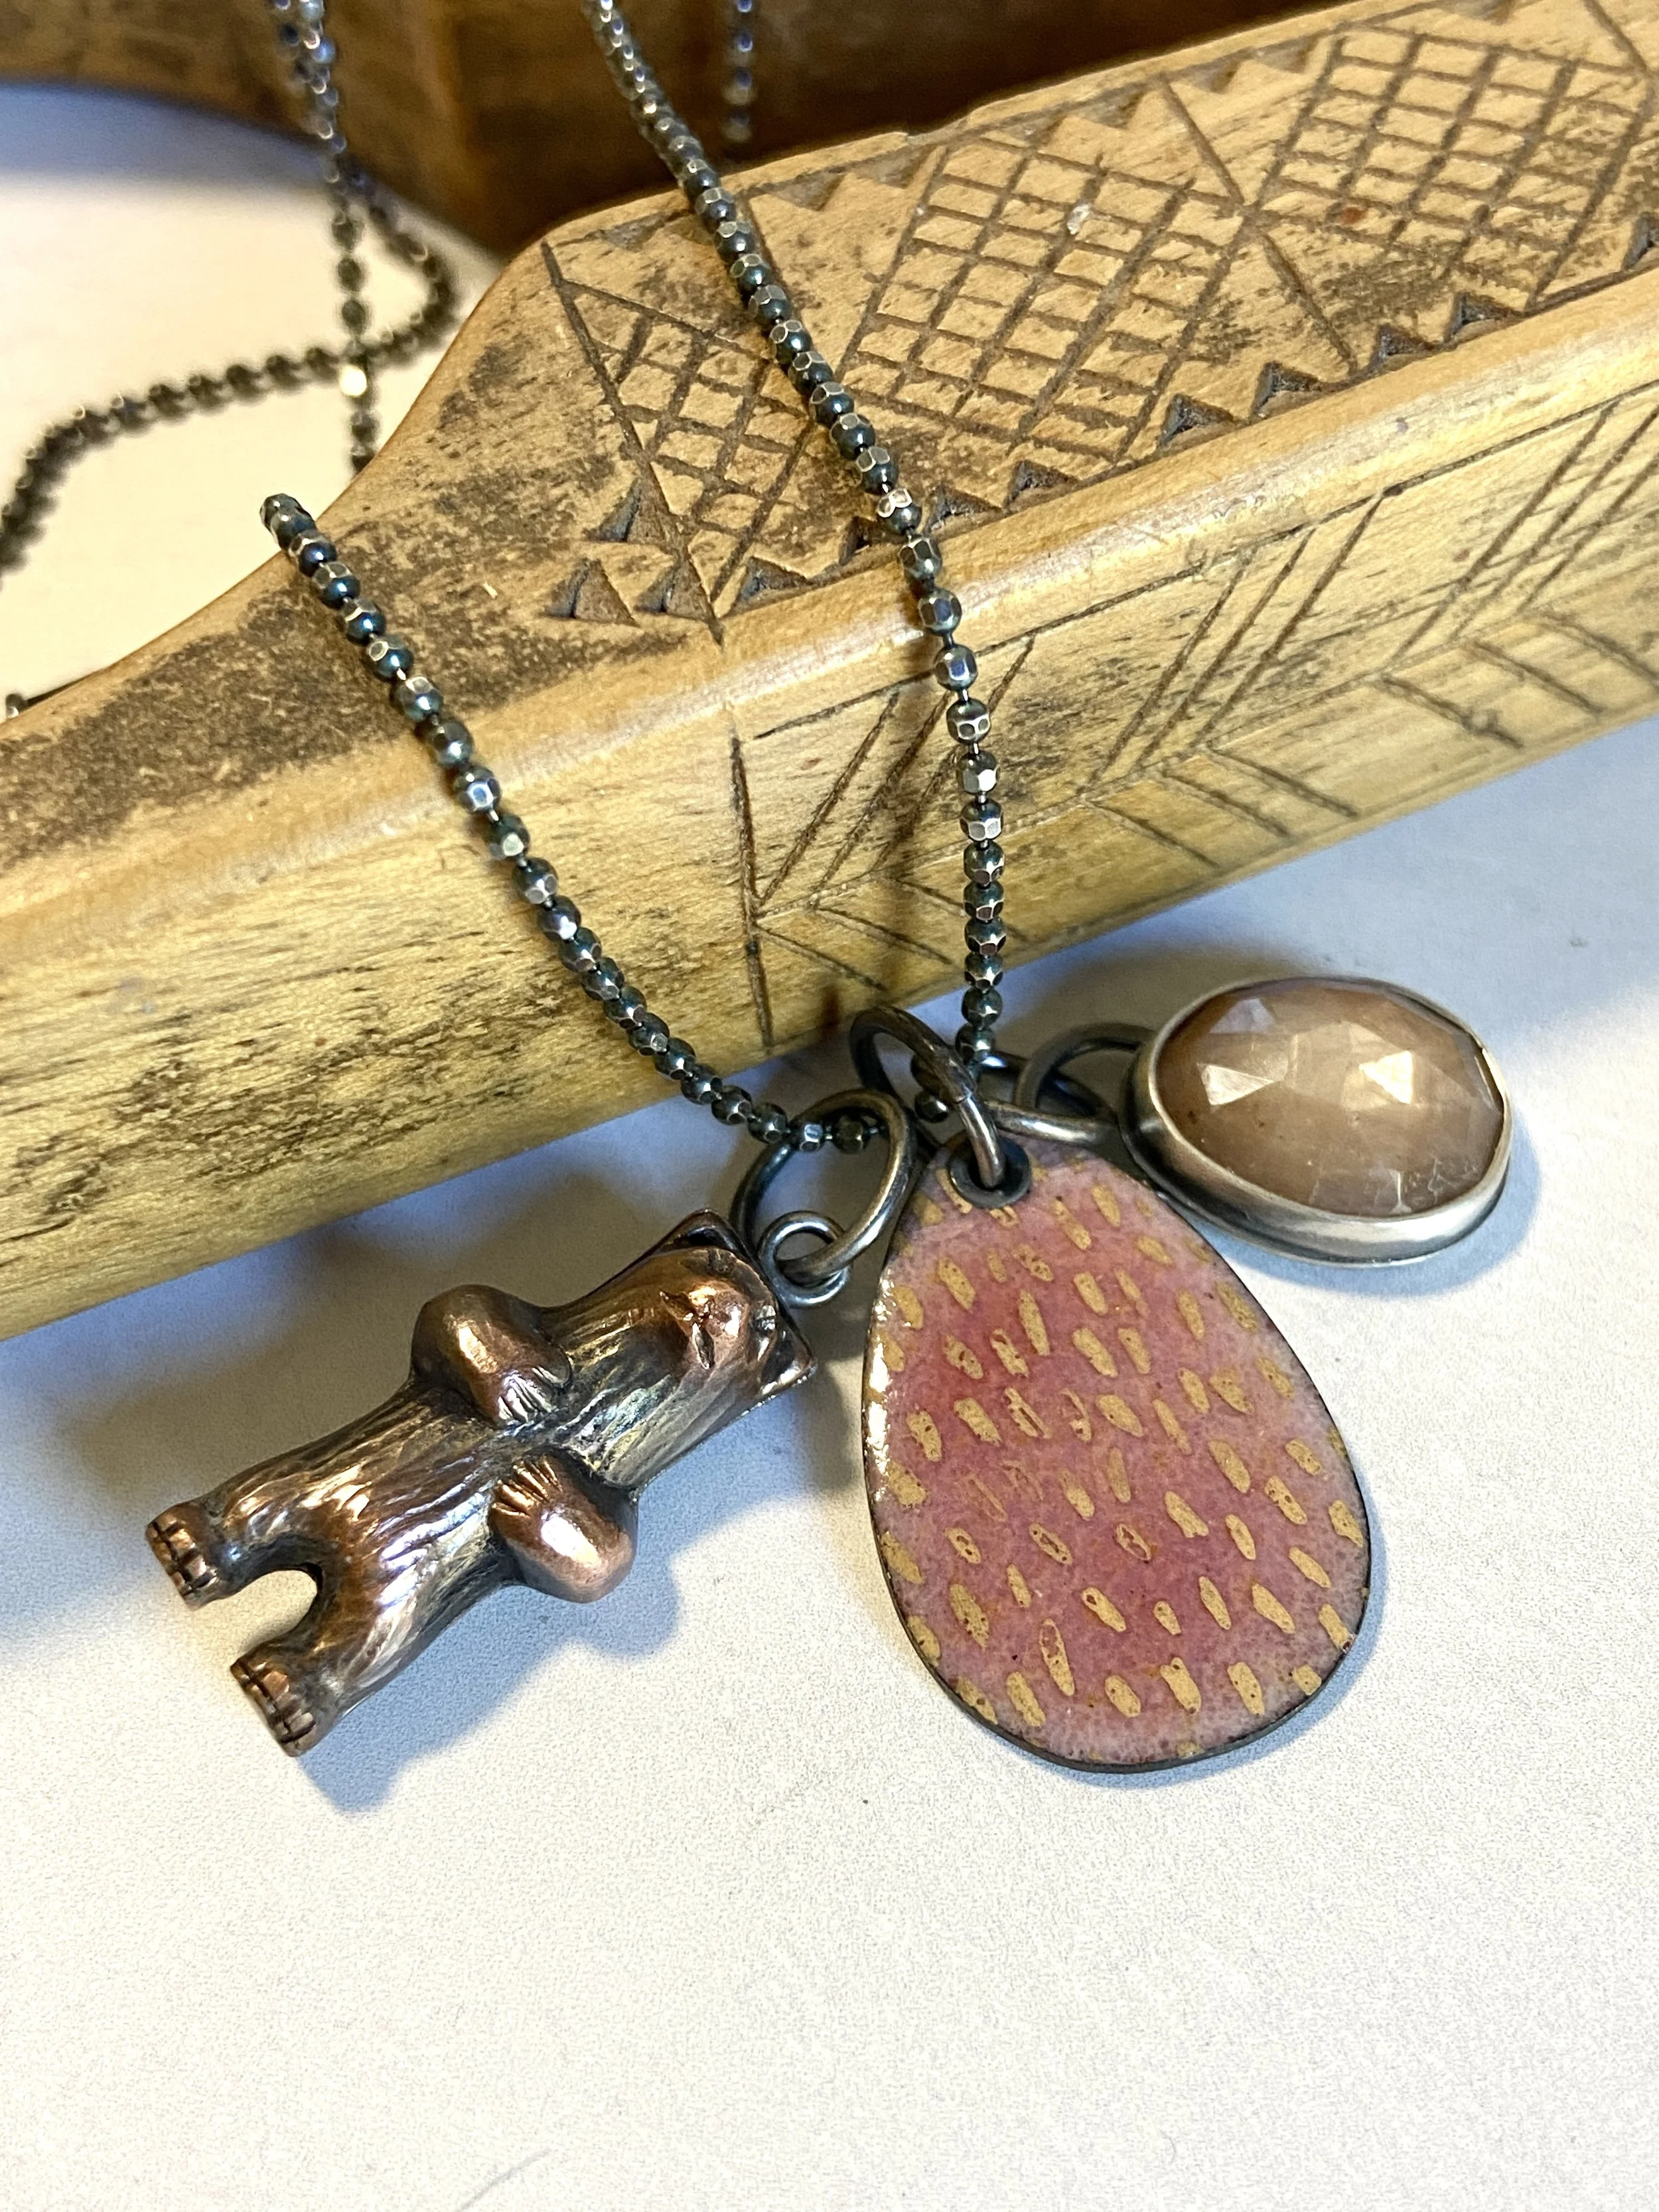
Make Your Own Charm Necklace